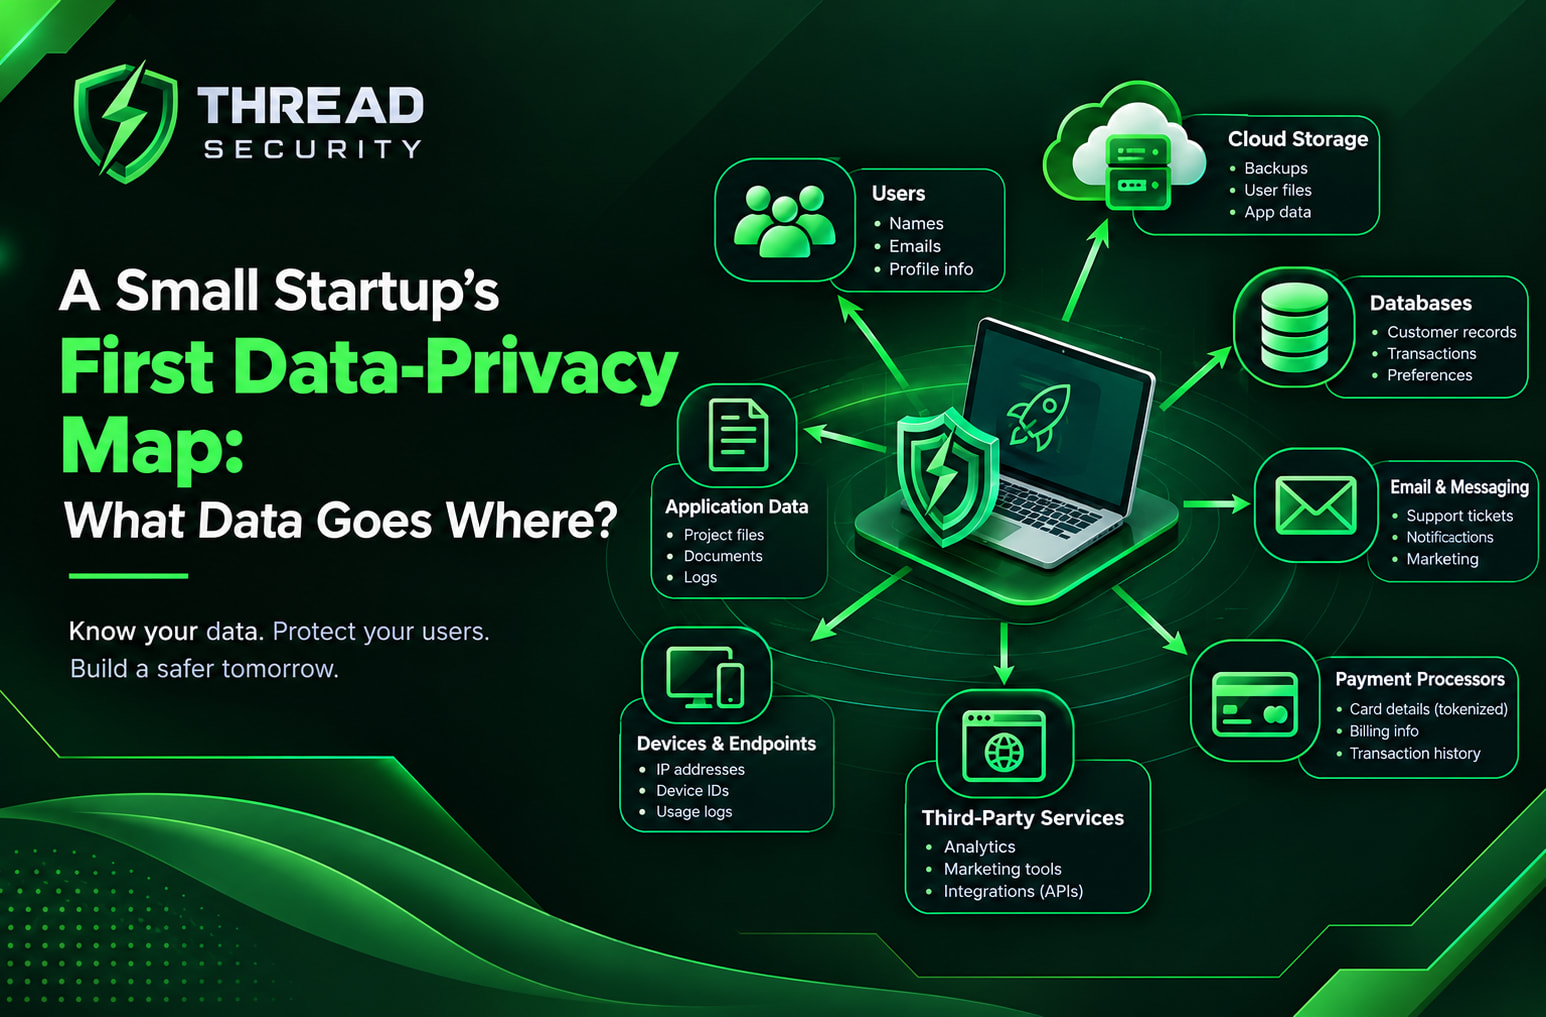
A data-privacy map is a visual and written record of every category of personal data your startup collects, where it is stored, who can access it, and which third parties it flows to. For a small startup, it is the single most useful compliance artifact you can build — because GDPR, CCPA, and enterprise customer questionnaires all begin with the same question: what personal data do you process, and where does it go? This guide walks through building your first data-privacy map in a structured, achievable way.
Why a Small Startup Needs a Data-Privacy Map
Startups collect more personal data than they realize — sign-up emails, payment details, support tickets, analytics events, employee records, and vendor logs. Without a map, teams cannot answer basic privacy questions, respond to data-subject access requests (DSARs), or assess vendor risk. A data-privacy map turns scattered knowledge into a shared reference, reduces regulatory exposure, and speeds up security reviews from enterprise buyers. It also reveals data you should not be collecting at all.
Step 1: Inventory the Personal Data You Collect
Begin by listing every category of personal data the business touches. Common startup categories include identity data (names, emails, phone numbers), authentication data (passwords, MFA tokens), payment data (card tokens, billing addresses), usage data (event logs, IP addresses, device identifiers), support data (ticket contents, chat transcripts), recruitment data (resumes, interview notes), and employee data (payroll, HR records). For each category, record the source, the purpose, the legal basis, and the system of record.
Step 2: Trace Where the Data Flows
Map data movement across internal systems and external vendors. Internal flows include movement between the application database, the data warehouse, the CRM, and the analytics pipeline. External flows include processors such as payment providers, email platforms, cloud hosting, error monitoring, and marketing tools. For each flow, note the direction, the mechanism (API, batch export, manual upload), and whether encryption is applied in transit and at rest. Highlight any flow that crosses a jurisdictional boundary, because international transfers carry extra obligations.
Step 3: Classify Data by Sensitivity
Not all personal data carries the same risk. Classify each category into tiers such as public, internal, confidential, and restricted. Restricted data typically includes special-category data under GDPR (health, biometrics, ethnicity), financial account data, government identifiers, and credentials. Classification drives retention rules, access controls, and encryption requirements, and it tells you which data would trigger breach-notification obligations if exposed.
Step 4: Record Retention and Deletion Rules
A privacy map is incomplete without lifecycle information. For each data category, document how long it is retained, why, and how it is deleted or anonymized. Many startups retain data indefinitely by default, which conflicts with data-minimization principles. Align retention with legal requirements, contractual obligations, and business need, and note where automated deletion jobs already exist versus where manual cleanup is required.
Step 5: Document Vendors and Sub-Processors
Every third party that touches personal data is a sub-processor and must appear on the map. For each vendor, record the data categories shared, the processing purpose, the contract and DPA status, the vendor's security posture, and the region of storage. This section becomes the backbone of your vendor-risk program and of the sub-processor list you publish to customers.
Step 6: Build the Map Format
Choose a format the whole team can maintain. Early-stage startups often use a simple spreadsheet with one row per data category and columns for source, purpose, system, vendor, sensitivity, retention, and owner. Larger teams may prefer a data-flow diagram built in a diagramming tool, a data-catalog platform, or a dedicated privacy-management tool. Whatever the format, assign a named owner for each entry and schedule a quarterly review so the map stays accurate as the product evolves.
Step 7: Connect the Map to Privacy Obligations
The map becomes operational when it feeds your core privacy processes. It should support DSAR handling by showing where a user's data lives, breach response by identifying affected records and notification obligations, consent management by revealing where consent is captured, and privacy-impact assessments by flagging high-risk processing. Link each entry to the relevant policy or control so auditors can trace obligations to evidence.
Common Mistakes to Avoid
Startups commonly build a privacy map once and never update it, omit employee and recruitment data, forget analytics and error-monitoring tools, treat vendor lists as static, and skip retention entirely. Others over-collect because no one asked whether a data category was necessary. A useful rule is to review the map at every product launch, every new vendor onboarding, and every pricing or billing change.
Turning the Map into a Living Asset
The first version of a data-privacy map does not need to be perfect. It needs to be accurate, owned, and reviewed. Start with your highest-risk data categories, document what you know, mark gaps explicitly, and assign follow-up actions. Over time the map becomes the shared source of truth for privacy engineering, security reviews, and customer trust — and a competitive advantage when enterprise buyers ask how you protect their data.
Conclusion
A data-privacy map is the foundation of every credible privacy program. By inventorying personal data, tracing flows, classifying sensitivity, recording retention, and documenting vendors, a small startup can meet GDPR and CCPA expectations, answer customer questionnaires confidently, and avoid collecting data it does not need. Build the first version now, assign an owner, and review it on a schedule — privacy maturity grows one accurate entry at a time.
Atish Chand
VERIFIEDFaculty Mentor · Thread Security
Faculty mentor & research guide at Thread Security Education.